
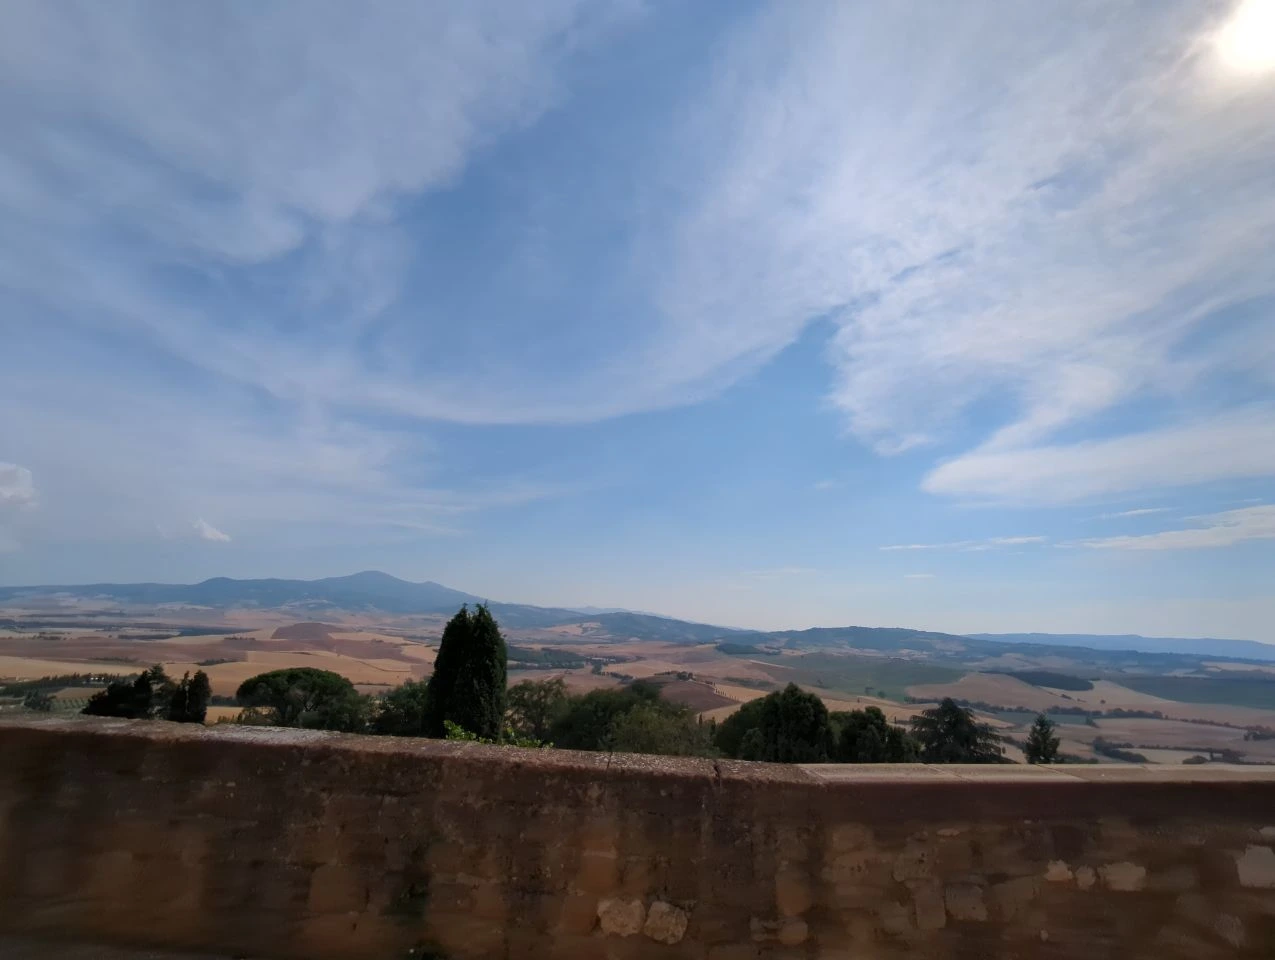
Pienza Viewpoints for Couple Photos: Balancing Portraits and Tuscan Scenery
Two photographs taken along Pienza’s village edge can tell completely different stories. In one, you might appear small against the broad fields and distant hills of Val d’Orcia. In another, you remain the clear focus while the countryside or Pienza’s stone architecture gives the portrait a recognisable sense of place.
Neither approach is automatically better. The right choice depends on what you want people to notice first, how much scale you want the landscape to convey and whether you prefer open scenery or architectural framing. In this guide, we'll walk you through the viewpoints that can make your photographs feel sweeping and cinematic, close and relaxed, or intimate and unmistakably connected to Pienza.
Updated
Table of Contents
What should lead your Pienza couple photoshoot?
Start by deciding how large you want to appear within the photograph. If you want the valley to communicate scale, leave more space around you and accept that expressions will be less prominent. If connection matters most, choose a viewpoint where the photographer can move closer while retaining a recognisable layer of countryside or stonework.
Foreground also changes the feeling of the image. Open paving creates simplicity and scale, the curved edge of a belvedere can lead the eye towards you, a low wall forms a stable visual base, and a passage surrounds you with texture and shadow. These are not interchangeable backgrounds. Each one gives the photograph a different structure.
Choose Via del Casello for sweeping Val d’Orcia views
In the widest photographs, you'll occupy a smaller part of the frame. This can create a powerful sense of scale, placing your relationship within a landscape that feels much larger than either of you. The open space can make the result feel calm and cinematic without requiring elaborate posing.
Decide whether you want a clean, minimal foreground or enough paving to show where you're standing. A lower camera position may give the foreground more presence, while a tighter angle can reduce it and concentrate attention on the valley. If the ground feels visually empty, walking slowly, turning towards each other or pausing near the edge can give the composition a clearer focal point.
You don't have to disappear into the scenery. A natural sequence can begin with both of you held within the broad valley view, then move closer until your faces and gestures become easier to read. This gives you one photograph that establishes the scale of Val d’Orcia and another that preserves the expressions you'll want to remember.
Via del Casello is a public walk, so benches and passing visitors can occasionally affect the cleanest angle. A short pause or a small change in camera position is often enough to preserve the peaceful appearance of the view.
Use the semicircular belvedere for a curved, balanced composition
This works especially well when you want both scale and a clear sense of where you're standing. Rather than appearing unsupported in a broad open space, you become the visual centre of a composition shaped by the curve. A wider photograph can include more of the semicircle for symmetry and context, while a closer position can use only part of the curve as a subtle leading line.
The curve also allows the photographer to change the relationship between you and the background without moving far. From one side, the photograph may feel more open and landscape-led. From nearer the centre, the composition can feel balanced and formal. From across the arc, the curve can create a gentle diagonal that makes a walking or turning photograph feel more dynamic.
Because this form is the main reason to choose the belvedere, avoid covering it with bags or using an angle that hides the curve completely. If the area is busy, it may be better to make one carefully timed wide photograph there and use the nearby wall for the rest of the sequence.
Choose the low wall for closer, more relaxed portraits
The wall gives you somewhere natural to stand, which can make the experience feel less like formal posing. You can turn towards each other, stand shoulder to shoulder or look across the valley while remaining visibly connected. Your photographer can show your full posture without allowing the landscape to overwhelm you.
If a suitable section is low, stable and open for public use, leaning or sitting can create an even more relaxed feeling. Your hands have somewhere natural to rest, your faces can move closer together and the photograph becomes quieter and more intimate. These positions should only be used where the wall, access and current local signs make them appropriate.
Think about how much of the wall you want to see. A long horizontal stretch creates calm and separates you clearly from the valley. A shorter visible section feels less formal and allows the background to carry more visual weight. Standing slightly forward can make you more prominent, while staying close to the wall strengthens the connection between portrait and location.
This setting can create several distinct photographs without repeatedly changing locations. You might begin with a full-length portrait, move closer for a shared expression and finish with a wider frame that opens towards Val d’Orcia. If a familiar section is occupied or unavailable, another usable stretch can often preserve the same balance without requiring an exact camera position.
Choose a stone passage for architecture-led portraits
You may still see Val d’Orcia, but only through the opening rather than as a complete panorama. This narrower glimpse can make the countryside feel more deliberate. The view becomes a bright layer beyond Pienza’s stonework instead of occupying most of the photograph.
The contrast can be especially atmospheric when you stand within the cooler shade of the passage and the valley appears brighter beyond you. However, the photographer must balance the light carefully. Standing too deep inside may leave your faces dark against a bright sky, while moving closer to the opening can bring softer light onto you without losing the stone frame.
A passage works particularly well as a secondary composition because it creates a clear change from open countryside to enclosed architecture without introducing an unrelated setting. It can also provide a calmer option when strong wind makes an exposed viewpoint uncomfortable. As these passages remain part of daily village life, entrances should always stay clear for residents and visitors.
Decide whether two or three viewpoints suit your walking sequence
For most couples, two settings create the most relaxed balance. Choose one primary viewpoint where you can spend time moving from full-length photographs to closer portraits, then add one nearby setting that changes the composition in a meaningful way.
Pair the low wall with the open viewpoint if you want close portraits plus one expansive image in which Val d’Orcia establishes the scale. Pair the wall with the semicircular belvedere if you want countryside in both settings but prefer a change from a straight visual base to a curved foreground. Pair the wall with a stone passage if you want the strongest contrast between valley depth and Pienza’s architecture.
Using all three composition types is most worthwhile when variety matters more than a slow pace and conditions remain cooperative. Keep the final viewpoint optional. If the path becomes busy, the light changes quickly or either of you would prefer more time at the primary setting, dropping the third stop will usually improve the experience rather than weaken the collection.
Countryside roads, cypress stops and fields beyond the village are not part of this walking sequence. They require separate planning for driving, safe parking, access and possible land permission, so they remain outside the scope of a village-edge session.
Match your timing to the wall, fields and sky
When the valley is clear and the fields are catching attractive light, begin with the open viewpoint or semicircular belvedere. These compositions benefit most from visible layers and variation across the landscape. If the foreground is already in shade, keep the pose simple and position yourselves where your faces still receive soft, even light.
When the wall is softly lit but the sky remains very bright, use the wall for closer portraits and reduce the amount of sky in the frame. This keeps attention on you and avoids asking one photograph to hold equal detail in pale stone, bright sky and shaded faces.
If the fields are bright while the wall and your faces are deeply shaded, change the angle or wait for the contrast to soften before relying on a close wall portrait. Moving immediately into a stone passage may increase the difference between the shaded foreground and bright valley, so the passage is often better once the outside light is gentler or when your photographer can place you near its opening.
Cloud and haze can also change the order. Soft cloud may make the wall and passage easier to photograph first because faces, stone and sky sit closer together in brightness. Haze may reduce the depth of distant hills, making an open panorama less dramatic but producing a gentle background for closer portraits.
A flexible sequence is therefore more useful than fixing every viewpoint in advance. Choose a preferred starting composition, assess where the most flattering light is falling, and keep one nearby alternative ready if the wall, fields or sky are not working together.
Dress and pack for wind, bright skies and walking
Mid-tone colours, earthy shades and richer colours usually remain distinct against pale stone, dry fields and a bright sky. Very pale outfits can still look beautiful, but their edges may appear less defined when the surroundings are also bright. If both of you plan to wear light colours, varying the tones or textures can help you remain visually separate from each other and the background.
Choose comfortable, stable footwear for the walk, stone surfaces, slopes and steps. If you want different shoes in the photographs, carry them and change only on safe, level ground.
Keep what you carry compact. Useful items may include a light layer, water, sunglasses for use between photographs, hair ties or pins, and a small brush or comb for wind. Place everything in one easy-to-move bag so it can be kept out of the frame without obstructing a bench, wall, passage or public path.
Book your Pienza couple photoshoot with Travaya
If you would like help choosing a viewpoint, walking sequence and time that suit you both, a Pienza photographer can shape the session around the photographs you value most. Share whether you prefer sweeping scenery, relaxed portraits or stronger architectural framing, and the route can remain focused without feeling rushed.
Frequently Asked Questions
Quick answers for planning couple photos at Pienza’s viewpoints
Usually not for simple handheld photography in publicly accessible areas, but confirm current access rules and follow local signs. Requirements may differ if you plan to use tripods, lighting equipment, large props or a bigger crew.
It depends on the chosen approach and viewpoint. Check slopes, steps, surface conditions and the amount of standing space before relying on a particular location. If necessary, choose one accessible primary setting rather than building the session around several stops.
Choose comfortable, stable footwear that suits stone surfaces, slopes and any steps along your planned approach. If you want different shoes for the photographs, carry them and change once you reach a safe, level position.
Possibly, but equipment rules may differ from those for ordinary handheld photography. Check current local guidance before the session and make sure equipment does not obstruct public paths or shared viewpoints.
Plan on parking outside the historic core unless current municipal guidance says your vehicle is authorised. Check current parking and ZTL signs before you travel, then continue to your chosen viewpoint on foot.


Our Pienza Shoots:
Book your Pienza couple Photographer!
Start Booking
A Romantic Walk Through Pienza’s Stone Streets

Three Simple Backgrounds That Add Variety to Your Pienza Couple Photos
Pienza Streets and Hills Photoshoot: From Warm Stone to Val d’Orcia Views
Pienza or the Tuscan Countryside? Which Backdrop Fits Your Couple Photoshoot?
What to Wear for a Pienza Couple Photoshoot: Colours, Shoes and Outfits That Move

Natural Couple Photos in Tuscany When You Don't Know How to Pose
ENJOY $20 OFF
Your first photoshoot when you become an email subscriber.
Related Articles

A Romantic Walk Through Pienza’s Stone Streets
Pienza’s compact historic centre brings Renaissance architecture, narrow passages, modest doorways and cobbled lanes into one walkable setting. From Corso Rossellino, you can move towards Via del Casello and the romantic side streets, choosing a short sequence

Three Simple Backgrounds That Add Variety to Your Pienza Couple Photos
You don’t need a famous landmark every time you want your Pienza couple photos to feel different. Some of the loveliest backgrounds are much smaller: an opening in the stone that reveals the countryside, seasonal plants spilling into a narrow lane or a church-
Pienza Streets and Hills Photoshoot: From Warm Stone to Val d’Orcia Views
Pienza gives you two beautifully different moods that can still feel like one connected story. You can begin among warm stone façades, arches and narrow streets, then let more light and space enter the photographs before finishing with views towards Val d’Orci