
October 10, 2026
Buda Castle District Photo Spots: A Walk Through Terraces, Gateways and Gardens
Budapest’s Castle District may look grand at first, but it offers far more than distant skylines and formal portraits. Within the same wider area, you can move from quiet streets and detailed stonework to arches, palace terraces, sculpture and planted gardens. In this guide, we’ll show you how to build a varied photo walk while adapting to the weather and whatever is accessible on the day.
Updated
Table of Contents
How to Create a Varied Gallery in Budapest’s Castle District
The most natural visual arc begins with smaller, more intimate surroundings near Matthias Church. It then moves towards the larger architecture of Fisherman’s Bastion and the palace before ending with sculpture or a quieter garden setting.
You don’t need to complete every stop for this idea to work. A closed gate, tiring staircase or misty skyline simply changes which parts of the district make sense that day. Keep the places that suit your timing, comfort and preferred style, then let each one add something different to the gallery.
Begin with Budapest at Street Scale
Begin close to the architecture. Weathered stone, a carved entrance or the edge of a church portal can fill the frame without demanding a grand pose. You can walk past the building or turn towards the light while the photographer works with the details around you.
From one of the nearby streets, you may also catch the Matthias Church tower between the trees at the far end of the road. The tower becomes a distant anchor rather than dominating the picture, while the street and surrounding buildings create space for natural movement. The exact view will change with foliage, traffic and visitor numbers, so look for the general idea rather than depending on one precise position.
This approach gives the opening photographs a clear sense of Budapest without turning them into standard landmark portraits. It also allows conversation and movement to lead the first part of the session instead of beginning with a fixed pose in an open square.
Keep Fisherman’s Bastion Brief, Then Continue Beyond It
Use the Bastion to capture one photograph framed by an arch, one movement-based image and, if visibility allows, one wider view. Then continue before its repeated stonework begins to dominate the gallery. This gives you its recognisable Budapest character without spending the whole session moving between similar turrets and openings.
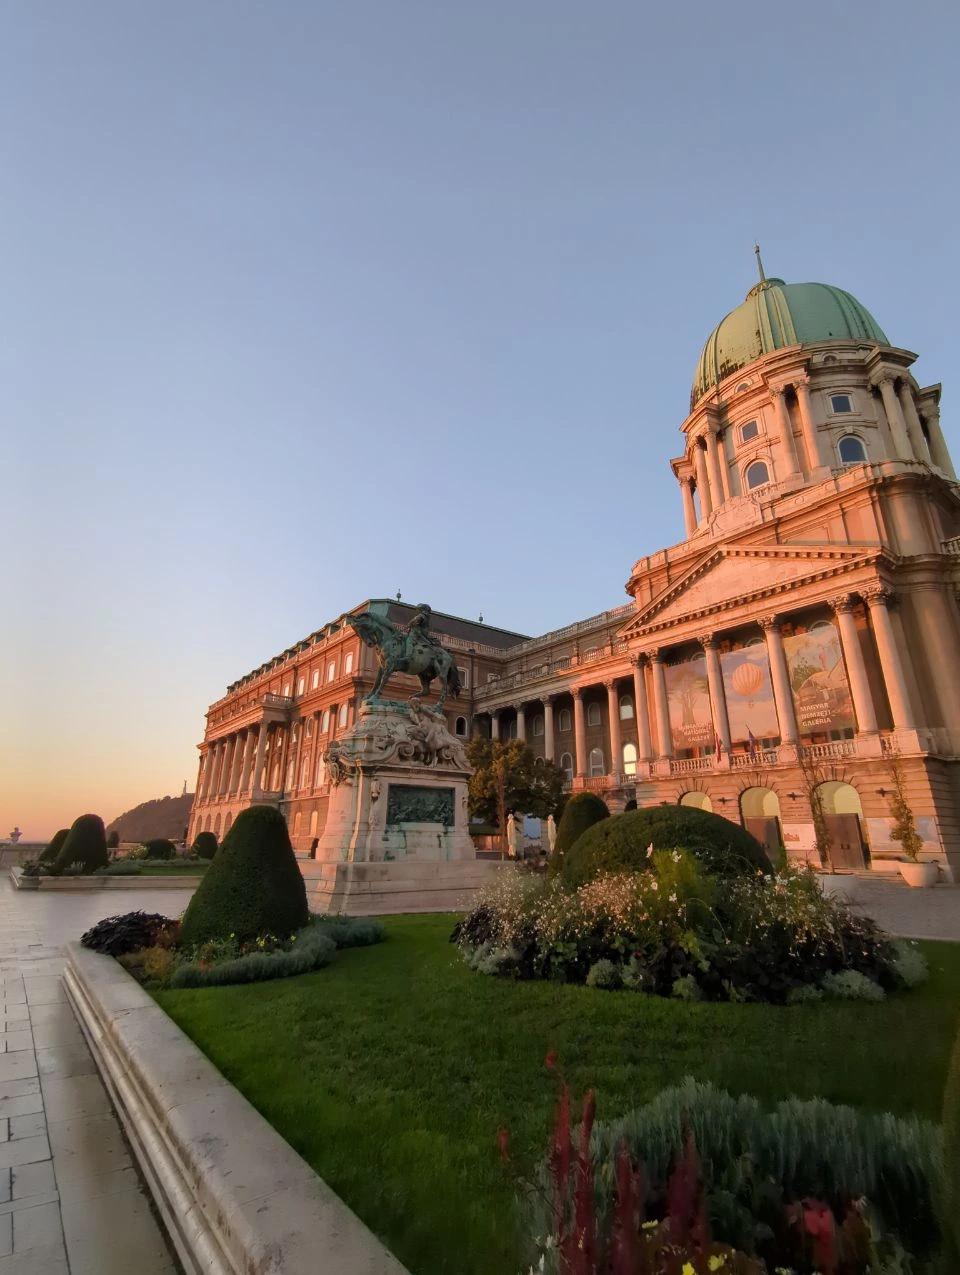
As you walk towards the palace, pale arcades give way to larger façades, gateways, stairs, balconies and sculpture. The change in architecture creates a natural transition from the familiar postcard view to stronger frames and deeper layers.
If the upper lookout matters to your photographs, check its current entry arrangements before building the session around it. Under the 2026 arrangements, the upper level requires a paid ticket from 2 January to 23 December, and advance booking is recommended for quicker access. Other parts of the Bastion area may operate differently, so decide whether the elevated view is important rather than assuming every section follows the same rule.
Use a Palace Gateway to Shape the Photograph
This can be especially helpful when the wider surroundings feel busy. Visitors, barriers and restoration work may compete for attention in a broad photograph, but a tighter angle through the gateway can remove much of that clutter while preserving the scale of the palace.
During the documented visit, the photographer could position this particular frame so that visible works fell outside the picture. Conditions may now be different, but the technique remains useful. If one direction is cluttered, look for a doorway, gateway or other architectural edge that simplifies the scene.
The gateway already gives the photograph a strong shape, so your movement can stay simple. You might stand just inside the opening, walk down the first few steps or turn towards the available light.
Change Height Before You Change Location
The stairs also give movement a visible direction. You can walk slowly along a landing, turn on a step or pause between levels while the surrounding lines guide the composition.
The terraces offer a similar choice on a larger scale. One level may place more emphasis on palace stonework and statues, while another opens towards the river, bridges, churches and Parliament. A higher camera position can bring out patterns in the stairs, while a lower one can make the architecture feel taller.
Clear weather may support a wider view across the Danube. In haze or fog, the immediate architecture will usually carry more of the photograph, so there’s less reason to force the skyline into every frame.
These changes in height rely on stairs, and the documented sequence hasn’t been confirmed as step-free. If stairs would make the session uncomfortable or impractical, treat the different levels as optional. Check current official accessibility information before choosing a meeting point, as a nearby lift, escalator or passage shouldn’t be assumed to provide a continuous alternative.
Move Closer at Matthias Fountain
You don’t need to stand directly in front of the fountain’s centre. Moving towards one side can place the sculptural figures in layers around you, with some details appearing clearly and others receding into the background. A close portrait might use only part of the sculpture, while a wider photograph can show how the fountain sits against the palace architecture.
The fountain is particularly useful when fog, haze or flat light weakens the skyline. Its shapes and textures remain visible, allowing the session to concentrate on expression and detail rather than waiting for a distant view that may not appear.
Finish in the Gardens If Access Allows
The official Várkert Bazár map marks the gardens, the Gloriette and an escalator. It can help you understand the area, but current signs and access notices determine whether the connection is usable on the day.
If access allows, look for a gradual change rather than one final grand backdrop. A garden stair can combine stone structure with planting, while a pergola creates repeated lines overhead and leaves break up the harder architecture. The greenery may be full, sparse or differently coloured depending on the season, so treat it as a flexible atmosphere rather than a guaranteed appearance.
The garden ending is optional. If a gate is closed, restoration work interrupts the connection or the route no longer suits your energy, a landscaped palace terrace can provide a calmer final setting without requiring you to continue lower down the hill.
Build a Flexible Castle District Photo Walk
Early sessions are often preferred because the light can be gentler and the best-known spaces may be easier to frame. The palace felt notably peaceful during a sunrise visit on 2 October 2026, particularly after the Bastion had seemed busier. That experience can’t guarantee quiet conditions on another morning, as tours, events, weather and seasonal travel patterns can all change the atmosphere.
Visibility deserves the same flexible approach. On a clear morning, the terraces may support wider frames containing the Danube, bridges, churches and Parliament. If fog or heavy haze hides those features, switch to nearby architecture and sculptural details instead.
Restoration work may require a similar decision. If a broad palace view no longer works, try a tighter architectural frame. If barriers dominate every useful angle, move to the next planned stop rather than spending the session trying to rescue one composition.
For a proposal, choose one primary setting and one nearby backup instead of coordinating the surprise across the complete route. Agree where the photographer will wait, which direction you’ll approach from and what simple signal will confirm that you’re ready. After the proposal, allow a few uninterrupted moments before moving into portraits, then use the gateway, stairs or terrace as the beginning of your photographed walk.
Before the session, verify only the current access conditions connected to the stops you’ve chosen. This keeps preparation manageable and prevents one uncertain feature from controlling the entire plan.
Plan Your Budapest Photo Session
Want help choosing the Castle District stops that suit your timing, mobility needs and preferred style? Explore Travaya’s Budapest photographers and arrange a private 30-, 60- or 90-minute session.
A shorter session can concentrate on one or two visual changes. A longer booking leaves more room for terraces, sculpture or an optional garden finish. Edited, high-resolution photographs are delivered through a private online gallery within five days. During booking, you can use WhatsApp to coordinate a practical meeting point and route.
Frequently Asked Questions About Buda Castle District Photo Spots
No. They’re separate but nearby settings within Budapest’s wider Castle District.
A smaller street near Matthias Church offers a gentle starting point before you move towards the busier monuments. This is a creative choice rather than the district’s only suitable entrance.
Not for every part of the wider area. Under the stated 2026 arrangements, only the upper lookout requires paid entry, but you should check the current rules before visiting.
No. Early sessions are often preferred, but visitor numbers can still change with tours, events, weather and the season.
Concentrate on nearby architecture and sculptural details rather than distant views. Fog can also give the district a softer, more enclosed atmosphere.
The full documented route includes stairs and hasn’t been confirmed as step-free. Treat the different levels as optional and check current official accessibility information before relying on an alternative route.
Sometimes, but the connection isn’t always available. Check the latest Várkert Bazár access information before planning to continue directly into the gardens.


Our Budapest Shoots:
Book your Budapest Photographer!
Start Booking
The Best Photo Spots in Budapest: Choose Your View, Light and Atmosphere

Budapest Viewpoints for Photography: Compare the Skyline, Foreground and Feel

Budapest Tram and Metro Photography: How to Frame Viewpoints, Movement and Station Design
A Couple Photoshoot at Fisherman’s Bastion: How the Session Unfolds

The Best Budapest Streets for Natural Couple Photos

How to Prepare for a Couple Photoshoot in Budapest
ENJOY $20 OFF
Your first photoshoot when you become an email subscriber.
Related Articles

The Best Photo Spots in Budapest: Choose Your View, Light and Atmosphere
Budapest gives you grand river views, pale stone terraces, green iron bridges, Austro-Hungarian architecture and quiet parkland. You do not need to fit all of them into one photoshoot. In this guide, we will compare the best photo spots in Budapest, explain how to combine them and show you what to check before finalising your plans.

Budapest Viewpoints for Photography: Compare the Skyline, Foreground and Feel
Budapest has no shortage of elevated views, but the highest point will not necessarily produce the photograph you love most. Each viewpoint changes how the skyline, foreground and people fit together. This guide compares the city’s main options so you can find a setting that suits the photographs you want to create.

Budapest Tram and Metro Photography: How to Frame Viewpoints, Movement and Station Design
Budapest gives you three distinct ways to photograph its public transport. You can frame a tram beneath Parliament or within the green ironwork of Liberty Bridge, slow down for the historic details of M1, or use M4’s deep spaces and repeating structures to create a more architectural image. There’s a particular satisfaction in preparing the composition, then watching a tram arrive at exactly the right moment. You don’t need to cover the whole network to produce a varied set of photographs. In this guide, you’ll learn how to choose the right visual approach, photograph movement safely from public areas and recognise when a simple personal photograph may be becoming a planned production.