
October 10, 2026
Budapest Tram and Metro Photography: How to Frame Viewpoints, Movement and Station Design
Budapest gives you three distinct ways to photograph its public transport. You can frame a tram beneath Parliament or within the green ironwork of Liberty Bridge, slow down for the historic details of M1, or use M4’s deep spaces and repeating structures to create a more architectural image. There’s a particular satisfaction in preparing the composition, then watching a tram arrive at exactly the right moment.
You don’t need to cover the whole network to produce a varied set of photographs. In this guide, you’ll learn how to choose the right visual approach, photograph movement safely from public areas and recognise when a simple personal photograph may be becoming a planned production.
Updated
Table of Contents
Choose the Story for Your Budapest Tram and Metro Photography
For an outdoor composition, choose the landmark according to the tram’s role. Parliament suits photographs where the vehicle supports a monumental façade. Liberty Bridge gives you strong ironwork, layered openings and possible colour contrast. At the Great Market Hall, transport can animate the street beneath its patterned roof and towers.
Underground, M1 is the better choice for close historic detail, while M4 offers large-scale geometry and depth. These lines have very different visual identities, so choosing one of each can help you produce a balanced set.
If your time is limited, Parliament followed by M1 creates a strong contrast between monumental architecture and intimate period details. Liberty Bridge paired with M4 produces a more graphic set built around structure, repetition and depth.
Build the Architectural Frame Before the Tram Arrives
If the frame isn’t ready, let the tram go. No photograph is worth a rushed step towards rails, traffic or a crossing.
Consider how large the tram should appear. A smaller vehicle can support the wider setting, while a larger one can become the dominant shape along the bottom of the image. Leave enough space in front of its direction of travel and avoid composing so tightly that you have to swing the camera across pedestrians when it arrives.
With a phone, lock the framing and exposure if your camera app allows it. With a camera, use the empty scene for a test frame. Check for distracting edges, sloping architecture and an exposure that loses important street or building detail.
After each pass, lower the camera and look around again. Check one frame, make a small adjustment and prepare for the next tram only when the space around you is clear.
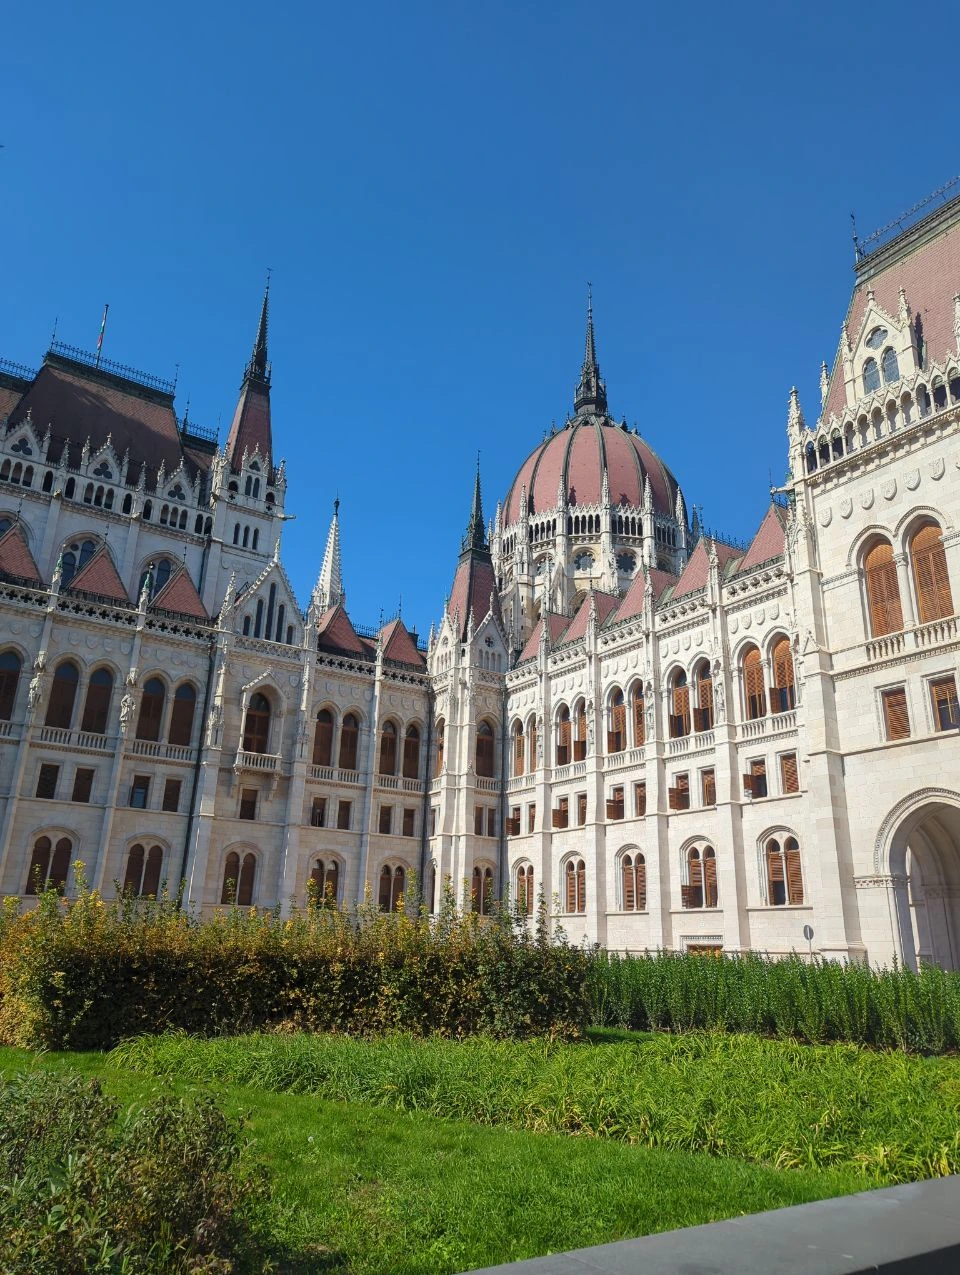
Photographing Trams Beneath the Hungarian Parliament
From a pedestrian area on 30 September 2026, Parliament and a passing tram could be held comfortably in the same frame. This confirms the composition’s potential, but it doesn’t promise which service or vehicle you’ll find during your own visit.
Decide how much of the building matters to your photograph. A wider view can show its relationship with the street, while a tighter composition can turn the tram into a band of movement beneath the façade. Watch for lamp posts, trees and overhead infrastructure that divide important architectural features. A small sideways adjustment within the same pedestrian area can often improve the alignment.
Time the shutter so the vehicle supports the building rather than covering the part of the façade you most want to show. If Parliament needs to remain crisp and carefully exposed, a little motion blur on the tram can work well.
Colours, vehicle models and services can change. Let the photograph record what was present without assuming the same tram will appear on another date.
Using Liberty Bridge for Structure and Colour Contrast
On 1 October 2026, a yellow tram passing through the green ironwork produced an immediate burst of contrast. It’s worth watching for a similar combination, but it isn’t guaranteed. The exact shooting position wasn’t recorded, so look from the pavement for your own safe opening rather than trying to recreate a precise camera position.
During the first tram passage, notice which opening separates the vehicle most clearly and where the beams cross its windows. You might frame through part of the ironwork, use a diagonal beam as a leading line or leave a cleaner opening for the tram to enter.
The vehicle can disappear into the bridge when its roofline, windows and surrounding beams all compete for attention. Waiting until it reaches a simpler opening can produce a clearer image. A little overlap can still work when you want the tram to feel embedded in the bridge rather than isolated from it.
Even if the vehicle isn’t yellow, the bridge still provides depth, shape and a recognisable Budapest setting. A favourable colour combination is an extra, not the foundation of the photograph.
If the people matter more than the vehicle, see our guide to using Budapest’s yellow trams in couple photos.
Capturing Street Movement at the Great Market Hall
Find a pedestrian position from which the roof has a clear outline. Avoid cutting through its most distinctive patterns, then reserve enough room below for a tram or other street movement.
Watch how quickly the vehicle rises into the architecture as it crosses your view. Release the shutter before it hides the roofline or towers, rather than waiting until it fills the bottom of the image. A partial tram can be more effective than a perfectly centred one because it suggests movement continuing beyond the photograph.
Should You Freeze the Tram or Pan With It?
Your first frame is a test, not a verdict. Tram speed, direction, focal length, available light and the steadiness of your hands will all affect the result. Check the vehicle’s edges after one pass. If they’re softer than you want, use a shorter exposure while preserving enough depth of field and image quality for the surrounding architecture.
Panning creates a different kind of photograph. Instead of holding the camera still, follow the tram so part of the vehicle remains defined while the surroundings stretch into directional blur. This can make an ordinary street feel more energetic, but the architectural background will become less descriptive.
Choose one visible feature on the tram, such as a window edge, door or sign. Begin following it before pressing the shutter and keep it in the same area of the frame while taking the photograph. Continue the movement after releasing the shutter instead of stopping abruptly.
Keep your feet in place and rotate smoothly from a safe pedestrian position. Panning usually takes several attempts, so don’t treat an unsuccessful first frame as a sign that the idea won’t work.
Choose the technique according to the story. If the relationship between the vehicle and architecture matters most, freeze the tram or allow only slight blur. If movement through Budapest is the real subject, panning can communicate it more strongly.
Photographing M1’s Historic Character Near Opera
Near Opera, observations made on 30 September 2026 found the period features that give M1 its distinct character. Look for those qualities rather than expecting one exact entrance or an empty platform. Designs and access conditions vary, and the Opera area shouldn’t be treated as a template for every M1 station or the wider Budapest Metro.
Build the composition around two or three details. A sign above a tiled wall may establish the setting, while a bench can anchor the foreground. Repeated lights or structural elements can lead the eye along the platform. You rarely need to include every period feature in one image.
A passenger at a respectful distance may add scale, provided an identifiable stranger doesn’t accidentally become the main subject. M1’s compact proportions leave less room to work, so keep your equipment close and stay comfortably clear of the platform edge. When the station becomes busy, lower the camera and let passengers move through before composing again.
There’s pleasure in slowing down here. A carefully framed sign, bench or section of tiling can capture M1’s character without turning the station into a checklist.
Finding Depth and Geometry on Budapest’s M4
Observe how arriving passengers change the visual density of stairs and escalators. A nearly empty scene may emphasise pure geometry, while a small number of people can reveal scale and create a useful rhythm. A crowded arrival may hide the structure you wanted to photograph, so be prepared to wait for the next change in the scene.
At Fővám tér, consider how far into the station the viewer’s eye can travel. Structural lines can pull the gaze downwards, while stairs or escalators can create a clear path through the image. Repeated elements work best when their spacing looks deliberate rather than cluttered.
A central position can emphasise symmetry and repetition. In busy conditions, an off-centre composition may reveal more layers and be easier to manage without compromising the design.
At Szent Gellért tér–Műegyetem, pattern and surface can hold attention within the wider depth. Its mosaic treatment allows you to make the decorated surfaces the main subject, place them around a receding passage or contrast their detail with the cleaner geometry of escalators and openings.
There’s a brief thrill when the lines, levels and passing people align. Follow the visual strengths available on the day rather than arriving with one predetermined photograph to copy.
How to Photograph Without Taking Over Passenger Space
Keep doors, stairs, escalator landings, validation points and platform edges clear. Move away from an escalator before stopping. Keep bags close, prepare your settings before lifting the camera and step aside after each attempt.
A phone or small handheld camera lets you react quickly and return to the passenger flow. Most visitors won’t need a large setup to create a strong photograph.
If you’re photographing someone, position them well away from doorways, platform edges and passenger routes. Consider privacy and the intended use of the image before allowing an identifiable bystander to become the dominant subject. Practical guidance about where you can stand doesn’t settle every question about image rights or publication, so commercial or sensitive use may require separate advice.
When to Contact BKK or BKV Before a Shoot
BKK’s travel conditions distinguish private recording from non-private activity that requires prior written consent. BKV also provides an application route for photography or filming on its vehicles, premises and controlled areas.
When considering a request, the operator may need to know why and where you’re shooting, how long you’ll need, what equipment and assistance are involved and whether the activity could affect passengers or operations.
A planned subject, assistant, tripod, lighting, repeated takes, reserved-looking working space or publication purpose can make the activity very different from a quick personal photograph. The more equipment and control you need, the more important it becomes to ask first.
No network-wide tripod or flash rule was confirmed for this guide. If either is important to your plan, ask BKK or BKV about the specific station, equipment, purpose and proposed activity before visiting.
A valid ticket or pass covers your journey. It doesn’t automatically cover a planned production, controlled-area access or an activity with a larger footprint. Describe your plans honestly when asking for clarification and follow any instructions given by transport staff.
What to Check Before You Leave
Treat old fares, route descriptions, screenshots and photographs as useful background rather than current authority. If you plan to name a tram line in a caption, verify it through up-to-date official information instead of relying on vehicle colour or a previous visit.
Charge your battery, check your available storage and prepare the camera so you can use it without unpacking equipment across passenger space. Keep the plan flexible. A changed route or unexpected vehicle doesn’t have to ruin the outing because Budapest’s architecture can still provide the photograph.
Photograph Budapest With Local Support
Moving trams and busy stations can make it difficult to enjoy the moment while also watching the timing, background and composition. If you’d like local photographic guidance, you can book a photographer in Budapest through Travaya. Your photographer can help with timing, composition and strong public viewpoints. Any required transport permission remains your responsibility.
Frequently Asked Questions
Yes, provided you remain in a suitable public pedestrian area and don’t enter rails, traffic or restricted space.
M1 is Budapest’s historic metro line, although details vary between stations.
Yes. Fővám tér is particularly strong for structural depth, while Szent Gellért tér–Műegyetem stands out for its mosaic surfaces.
Freeze it when the vehicle’s shape or alignment with a landmark needs to remain readable. Pan when movement is the main subject.
You may need permission, especially if the equipment affects passenger movement or makes the session look organised. Check current guidance with BKK or BKV before visiting.
Possibly. Ask BKK or BKV if the activity is planned, organised, intended for non-private use or more involved than an unobtrusive personal photograph.


Our Budapest Shoots:
Book your Budapest Photographer!
Start Booking
The Best Photo Spots in Budapest: Choose Your View, Light and Atmosphere

Budapest Viewpoints for Photography: Compare the Skyline, Foreground and Feel

Buda Castle District Photo Spots: A Walk Through Terraces, Gateways and Gardens
A Couple Photoshoot at Fisherman’s Bastion: How the Session Unfolds

The Best Budapest Streets for Natural Couple Photos

How to Prepare for a Couple Photoshoot in Budapest
ENJOY $20 OFF
Your first photoshoot when you become an email subscriber.
Related Articles

The Best Photo Spots in Budapest: Choose Your View, Light and Atmosphere
Budapest gives you grand river views, pale stone terraces, green iron bridges, Austro-Hungarian architecture and quiet parkland. You do not need to fit all of them into one photoshoot. In this guide, we will compare the best photo spots in Budapest, explain how to combine them and show you what to check before finalising your plans.

Budapest Viewpoints for Photography: Compare the Skyline, Foreground and Feel
Budapest has no shortage of elevated views, but the highest point will not necessarily produce the photograph you love most. Each viewpoint changes how the skyline, foreground and people fit together. This guide compares the city’s main options so you can find a setting that suits the photographs you want to create.

Buda Castle District Photo Spots: A Walk Through Terraces, Gateways and Gardens
Budapest’s Castle District may look grand at first, but it offers far more than distant skylines and formal portraits. Within the same wider area, you can move from quiet streets and detailed stonework to arches, palace terraces, sculpture and planted gardens. In this guide, we’ll show you how to build a varied photo walk while adapting to the weather and whatever is accessible on the day.